Serving Eugene, Greater Portland, Vancouver, Everett, Bellingham, and Nearby Areas
Serving Eugene, Greater Portland, Vancouver, Everett, Bellingham, and Nearby Areas
Click on a photo to enlarge.
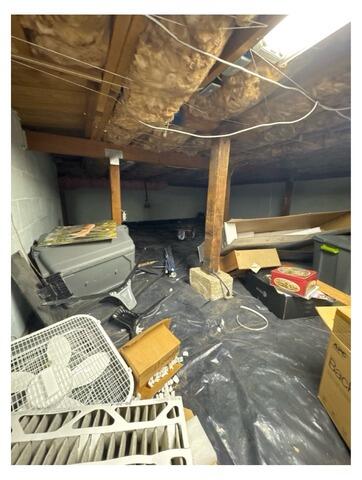
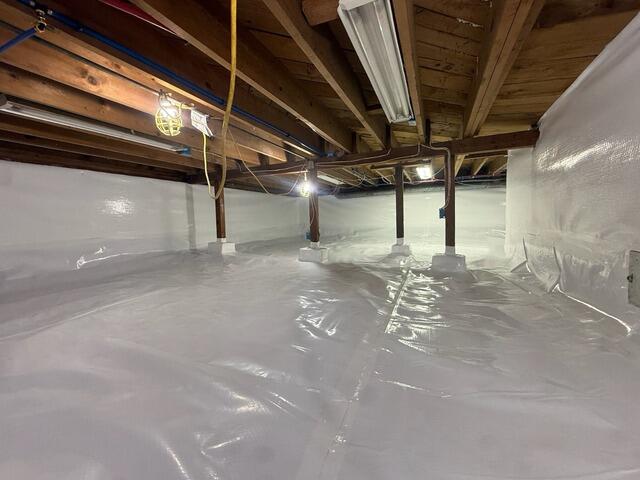
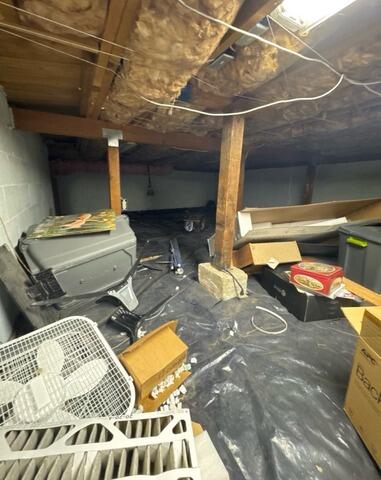
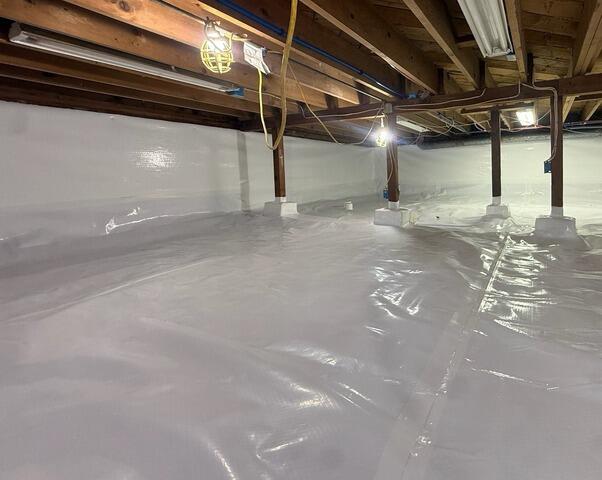
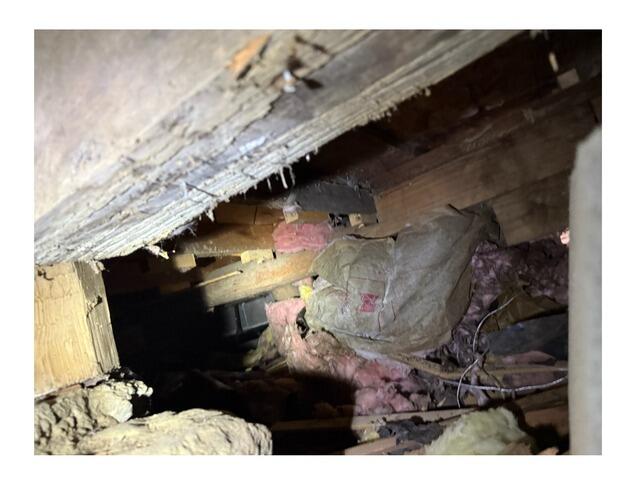
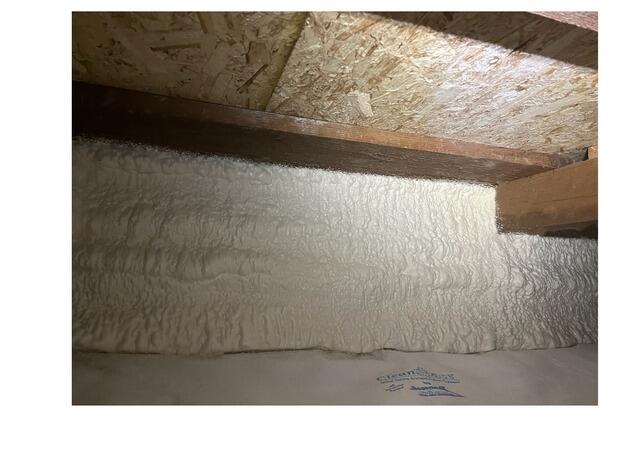
These homeowners were looking to upgrade their crawl space to create additional storage in their home and gave us a call for a free visit. We went out and thoroughly inspected the crawl space and then met up with the homeowners to work on a plan that will help create a stable and healthy environment for them to have peace of mind about their crawl space. The homeowners then signed the estimate and we began this project. We start by removing all of the debris, fiberglass insulation and old vapor barrier. Since there was not much water, we install our SmartDrain system that will alert the homeowner of a possible plumbing leak with an audible alarm and will drain the leak into a drywell underneath the CleanSpace. We then cover all of the vents and seal them shut to prevent outside air from entering. Next, we install our TerraBlock system directly onto the dirt floor of the crawl space and this creates an insulated barrier between the home and the earth that will block any moisture from making its way up. We anchor our 20 mil thick CleanSpace system into the foundation walls, between the footing and wooden posts and over top of the TerraBlock system and this is sealed with our heavy duty CleanSpace tape. To keep the environment controlled we install our SaniDry Sedona. This is our powerful and highly effective dehumidifier that will eliminate damp and musty odors while drying and filtering the air. It will also keep the home at a healthy relative humidity, improving overall indoor air quality. Lastly we install our spray foam insulation directly onto the foundation walls up to the rim joists, filling every crack and void, ensuring a complete airtight seal and no air leaks. With this full encapsulation, these homeowners can be sure their home is protected for years to come and they can now use this clean, healthy and stable crawl space as extra storage.
A common frustration that homeowners experience, is cold floors above their crawl space and high heating and cooling costs. This is caused by inadequate subfloor insulation, as well as crawl spaces that are not properly sealed, allowing cold air to enter. The best way to prevent heat loss through your flooring, is to fully encapsulate your crawl space. This means sealing the space entirely, to achieve an air-tight seal, as well as the installation of top-to-bottom professional-grade insulation inside of the crawl space. To ensure a safe air quality inside of the space, as well as inside of your home, a heavy-duty dehumidifier is installed to clean, and remove moisture, allergens, and toxins from the air. These machines run 24/7, saving homeowners time, and providing peace of mind. Our Design Specialists thoroughly inspect each crawl space prior to encapsulation, to find all evidence of past water intrusion. Depending on the existence, and level of water intrusion and damage, our Specialists determine if installation of drainage components is necessary, and if so, they recommend the most suitable system tailored to the needs of each individual crawl space. After a crawl space is encapsulated, it will remain dry, healthy, and stable for years to come. Because our encapsulation materials are so durable, your formerly dirty and non-protected crawl space, will be transformed into a bright, welcoming area that can be safely used for dry storage. A fully encapsulated crawl space saves homeowners up to 40% per year on heating and cooling costs, and creates a controlled, and healthier environment inside of your home. Our waterproofing experts work diligently, and with a high attention to detail, to install all encapsulation materials with the highest level of professionalism to ensure effectiveness. With over 50 years in the waterproofing industry, John's employs the best of the best, equipped with the knowledge and experience necessary to provide WOW service to every single customer!
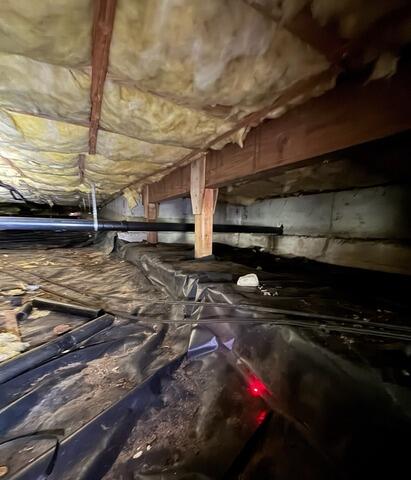
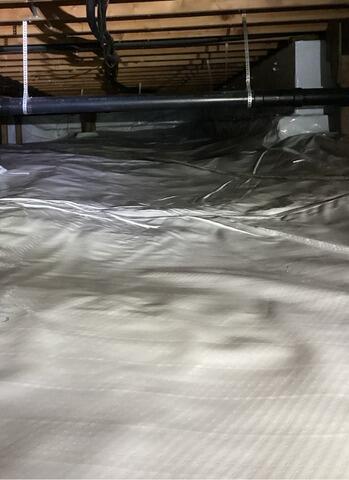
These homeowners were looking to put their home on the market but found a lot of problems in their crawl space. They knew that if these issues was not addressed properly - it would cause problems with the sale. Encapsulating the crawl space not only helps with the air quality in the home, and to reduce energy bills but it can help over all increase the home value. These homeowners wanted to make sure that this problem was permanently solved so they called up John's Waterproofing for a free visit. Our Real Estate Response team went out to thoroughly inspect this crawl space and come up with the best plan to create a dry, healthy and stable home to confidently place it on the market. We start this project by removing all of the debris, fiberglass insulation and old vapor barrier. We then removed one of the damaged wooden beams and replace it with a steel beam. Then, since there was some problems with the floors sagging, we replaced the weak and damaged wooden posts with our SmartJack system. These will provide secure and stable support as well as lift up the floor. Next we dig a trench around the interior perimeter of the crawl space in which we place a 3 inch perforated pipe into a silt sock to secure a safe passage for water to drain to the lowest point. Then, at this low point we install our SuperSump Plus. This system will pump all of the water that enters outside and away from the foundation through a discharge line. We then cover all of the vents to seal them permanently from the outside to stop unwanted air from entering the crawl space. Following this, we install TerraBlock onto the dirt floor, creating an insulated barrier between the home and the earth. On top of the TerraBlock we install CleanSpace. This is also anchored into the foundation walls up to the rim joists, and inserted between each footing and post. To control the environment, we install or SaniDry Sedona Dehumidifier that will effectively eliminate damp and musty odors while keeping the home at a healthy relative humidity. Lastly, to finish, we spray our foam insulation directly onto the foundation walls up to the rim joists. This process will fill every crack and void guaranteeing a complete airtight seal. Now that this home is fully encapsulated, these homeowners can be sure that their home will be safe for the next owners.
Standing water in the crawl space is an overt way to identify that a water problem is present in the crawl space. This owner contacted John's Waterproofing and scheduled their free inspection to see what was happening in the crawl space and how they could solve the issues. For full protection we suggested a full encapsulation. This system begins with a full drain system and sump pump. These will work together to ensure groundwater is channeled and pumped safely away from the homes foundation. Next we layer TerraBlock and CleanSpace along the floor. This will insulate and seal the space from exterior elements, each vent in the space sealed as well. A SaniDry dehumidifier addresses the spaces relative humidity and spray foam is applied along the foundation walls to air seal and complete the insulation process.
Did you know that 40% of the air inside of your home comes from your crawl space? This is why it is of paramount importance that crawl spaces are kept clean, dry, and rodent-free. When crawl spaces are neglected, they can quickly become nasty breeding grounds for mold, rot, and rodents - the particles and smells of all these contaminants seeping into your home daily. Damage caused by standing water can also cause catastrophic structural damage to your home. Once mold and rot have taken root, costs related to returning structural integrity to your home can become exceedingly high and labor-intensive. Additionally, a rodent infestation beneath your home is both nasty, and difficult to mediate, often leading to infestations inside of your home as well. When mold, rot, and rodents are allowed to run rampant in crawl spaces, the quality of the air in your home becomes very unhealthy for your loved ones. The best way to prevent these serious issues from occurring, is to encapsulate your crawl space, which means creating an air-tight seal inside of the space, using high-quality components installed by the waterproofing experts.
To begin helping this home, our crew removed the old vapor barrier, debris, and fiberglass insulation. We than place a drain system along the interior perimeter of the crawl space. Next, we equip the space with a sump pump, to match the exact needs of the space. After sump pump installation, all water intrusion will be immediately expelled away from the home via an underground discharge line. A layer of TerraBlock insulation is fit along the dirt floor and we install CleanSpace overtop, sealing this into the crawl space. To ensure a safe humidity level at all times, we install a SaniDry dehumidifier. The style of dehumidifier is selected based on the exact needs of the space. All exterior vents are then sealed with rigid plastic covers, preventing rodents and debris from entering the space. Our crew also replaces the original access door with an EverLast Access Door, which is air-tight and leaves no gaps along the edges when shut. Our EverLast Doors offer superior durability, and will never rot or discolor. Finally, to seal every crevice and void along the foundation walls inside of the crawl space, our Spray Foam installation experts arrive, to spray this permanent, highly effective insulation onto the walls. This advanced level of insulation acts as an air, thermal, moisture, and vapor barrier, and has the potential to save homeowners up to 40% per year on energy costs. Encapsulated crawl spaces not only transform the area beneath your home into a clean, dry space - they also ensure that the health of your loved ones is protected everyday, and that the structural stability of your home never suffers due to water damage. After over 50 years in the waterproofing industry, the crew members here at John's are true experts in their field, and take great pride in keeping homes dry, stable, and healthy.
our service area